Monday, March 1, 2010

#1 Electric Light & Switch

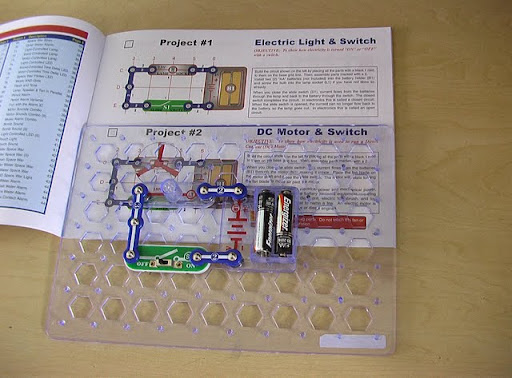
Objective: To show how electricity is turned ON or OFF with a switch.

Electricity goes in a circle. The electricity flows through and through, back through the battery box. When you turn it off, the rest of the electricity in it goes back to the battery box.

#3 Sound Activated Switch

Objective: To show how sound can turn ON an electric device.

The music will play for a short time. When it stops, clap your hands. You put your hands close to the whistle chip and clap and it makes the music play for a short time again. It uses sound to activate it, that's why it's called a Sound Activated Switch.

#4 Adjusting Sound Level

Objective: To show how resistance can lower the sound from the speaker.

This project was similar to #3, but now in #4 we added a resistor. A resistor makes sure there's not too much electricity so it doesn't explode or burn up in fire. In #4, the resistor levels the amount of electricity being used, so there's not too much. The music played for a while and then stopped. Then you had to say something or make a sound, which would activate the whistle chip, or you would tap the whistle chip, which would make it activate. Then it would play the song.

#5 Lamp & Fan in a Series

Objective: To show how a lamp can indicate when a fan is running.

When you turn this project on, the fan will take a little while to start running fast because the electricity is being used for the lamp first. Electricity flows in a straight line. That's basically it.

#6 Lamp & Fan in Parallel

Objective: To show how an indicator light can be connected without affecting the current in the motor.

I don't really know why the light doesn't work when you turn on this project, but I do know that the fan still goes at its normal speed when on. This project didn't work the way we expected. We expected the light to turn on when it was on, but it didn't turn on like it was supposed to.

#7 Light Emitting Diode

Objective: To show how a resistor and LED are wired to emit light.

In project #8 the LED was placed left, but now it is placed right. When you turn it on, the electricity flows in one direction and then that makes the LED light up.

#8 One Direction for LED

Objective: To show how electricity can only pass in one direction through an LED.
In #7, the previous project, the D1 LED is placed forward, or right. In this project, it's placed left, and electricity only goes in one direction. If you place the LED the other way and turn it on, it does not light up because electricity can only go in one direction.

#9 Conduction Detector

Objective: To make a circuit that detects the conduction of electricity in different materials.
Conduction is where electricity is being transported from one place to another, like a charger for a computer. This conductor senses if electricity is being conducted. Mom and I tested to see if metal or plastic or glass were conductors. Metal = yes, plastic and glass = no.

#10 Space War Alarm Combo

Objective: To combine the sounds from the space war and alarm integrated circuits.
This one is just for fun. It doesn't really say anything. It combines alarm sounds and space war sounds, but my space war IC is broken.

#12 Decreasing Saucer Lift

Objective: To show how voltage reflects the speed of a DC motor and can decrease the lift of the saucer.
This project is copied from Project #11, and the lamp is added, which adds more electricity to the project being done, which makes it have a harder job so the fan goes slower, and so does the motor. The fan won't go up in the air because the lamp adds resistance.

#14 The Fuse

Objective: To show how a fuse is used to break all current paths back to the voltage source.
The piece that is not connected to the rest blocks the passage of electricity so the fan can't run, and neither can the lamp. If you take any circuit out, it won't work because the flow of the electricity needs to go in a circle so it can keep working.

The part at the bottom was part of #13 Two-Speed Fan, which was attached and now is detached, which blocks all current flow and makes it go back to the batteries.

#13 Two-Speed Fan


Objective: To show how switches can increase or decrease the speed of an electric fan.
There are two different switches. Well, there is a lamp so it doesn't go as fast because more electricity is being used. So when you press the Press switch, that makes the lamp stop and the fan goes faster. The S2 switch stops the lamp (turns it off) and the fan goes faster.